
Table of Contents
Server Installation
We start the Digital Office series with installing a Linux server. My choice of Linux is to use Ubuntu Server. There are many other good Linux systems, I use this because I got more experience with Ubuntu systems.
If you are using another Debian based system like MX Linux, Linux Mint, Elementary OS or Kali Linux you can easily follow this guide. But try to have a pure server based Linux, without any desktop features. Because that makes the server more lightweight.
With other linux systems like Arch, Redhat, CentOS etc. You probably need to use another setup.
Download Ubuntu Server
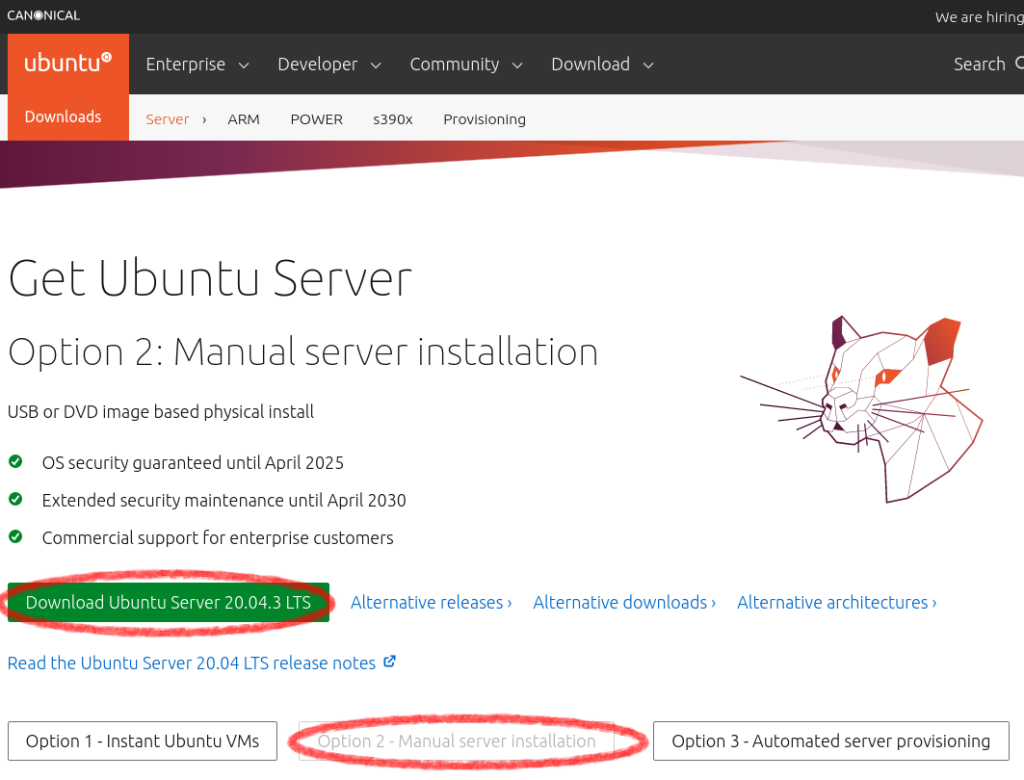
You download the ISO image of Ubuntu Server through their homepage Ubuntu.
- Choose [Option 2: Manual server installation]
- Click on the green button [Download Ubuntu Server 20.04.3 LTS] to download the ISO image.
ISO image file you downloaded can be used in 3 different ways.
- In virtual machine, just mount that ISO file.
- USB-stick with help of tools like (balenaEtcher for Linux / Rufus for Windows) to make it possible to reboot the system.
- DVD, burn the ISO image to a DVD.
Then you reboot the machine with the choice of your medium inserted.
Ubuntu Server Installation
- Welcome screen.
Choose your language on you want on your server system.

- Keyboard layout.
You can use [Identity keyboard], but for Japanese keyboard (as I am using) did not work correctly. So I manually choose the keyboard layout here.

- Network settings.
If your system has multiple network cards you can choose your main network card here. This is usually been auto detected so you just press [Done].

- Proxy settings.
If you are in a local network that connects to internet through proxy server. You need to fill that server address here. Normally you can skip this by simply click [Done].

- Ubuntu archive mirror.
Use the default that is already written in your installation. Its based on your location.

- Storage settings, 1 of 3.
In this setup we do use the whole hard drive for Ubuntu. There is many different ways to set this up, but we keep it simple in this case.

- Storage settings, 2 of 3.
A summary overview of how the partition will be setup.

- Storage settings, 3 of 3.
A confirmation and information that info on that hard drive will be erased. If everything seems okay for you press [Continue].

- Profile settings.
Admin information of the server, make this password strong if you want to open the server to the Internet. And do not forget the password… 🙂

- SSH Setup.
When you do a fresh Ubuntu server install, you can choose to install SSH at the same time. I do recommend you do that. If you do not install it now you can always add that later. I am explaining how to do that later in this blog post.

- Server Snaps packs.
Here you can choose other packages to install at the same time. I do skip this because I will use Docker Engine and use dockers instead.

- Completed.
When install and updates are done, you just do a reboot of the system. If no trouble so far, congratulations! The base server is up and running.

SSH Installation
If you installed the SSH at the same time as the server installation, you can jump directly down to the second last step to check if the SSH works.
SSH server is great way to use remote control by terminal, even in a local network environment. You can access the server terminal from a PC that has a desktop environment. That makes it easy to follow guides from the internet when doing a server setup. That can be time consuming to do with a bare-bone server setup, because you need to type everything by hand (no copy & paste) and you don’t have any web browser on the server.
Install and check SSH services
- Do an update and upgrade on your server in case there are some changes. It is not probably not necessary to upgrade each time but I like to do that. (If there is some reason I should not upgrade at the same time, please make a comment about that.)
After that, run the installation for the SSH server.
sudo apt-get update && sudo apt-get upgrade -y
sudo apt install openssh-server
- When installation is done, it’s a good time to see if the SSH service is up and running. You do that with a command called systemctl.
sudo systemctl status sshd -l
- You will get a similar result like displayed below. Please take a look at the second and third row to see the status of SSH service. If it’s running fine then it’s time to test the SSH connection.
					● ssh.service - OpenBSD Secure Shell server
     Loaded: loaded (/lib/systemd/system/ssh.service; enabled; vendor preset: enabled)
     Active: active (running) since Mon 2021-07-12 07:04:48 UTC; 1 day 20h ago
       Docs: man:sshd(8)
             man:sshd_config(5)
    Process: 679 ExecStartPre=/usr/sbin/sshd -t (code=exited, status=0/SUCCESS)
   Main PID: 714 (sshd)
      Tasks: 1 (limit: 9448)
     Memory: 5.9M
     CGroup: /system.slice/ssh.service
             └─714 sshd: /usr/sbin/sshd -D [listener] 0 of 10-100 startups
- If you are on the same local network and also using Linux (Ubuntu as in this example) as a remote client, you just type the ssh command with username and IP to the server. It will prompt the password for the user when it tries to connect.
If you are using windows as a remote client, you need to install a SSH client to be able to connect to the server. I have heard that PuTTY is a good and free opensource SSH tool, but I will not cover that here.
ssh mooseadmin@192.168.0.13
- When you successfully logged in for the first time you will see a similar welcome text. You will also notice that the command line’s first part has changed to the remote user. To end a SSH session, just close the terminal or type [exit].
Now it’s time for the next step, the Docker Engine and Docker Compose.
					tutorial@guide-ubuntu:~$ ssh mooseadmin@192.168.0.13

The authenticity of host '192.168.0.13 (192.168.0.13)' can't be established.
ECDSA key fingerprint is SHA256:mkqn3u2B7BtaVrUxXmBYi+8+8eRWDkMLrj0ydpc4EkU.
Are you sure you want to continue connecting (yes/no/[fingerprint])? yes
Warning: Permanently added '192.168.0.13' (ECDSA) to the list of known hosts.
mooseadmin@192.168.0.13's password: *********
Welcome to Ubuntu 20.04.2 LTS (GNU/Linux 5.4.0-77-generic x86_64)

 * Documentation:  https://help.ubuntu.com
 * Management:     https://landscape.canonical.com
 * Support:        https://ubuntu.com/advantage

  System information as of Wed 14 Jul 2021 03:48:27 AM UTC

  System load:                      0.1
  Usage of /:                       49.0% of 48.47GB
  Memory usage:                     61%
  Swap usage:                       0%
  Processes:                        226
  Users logged in:                  0
  IPv4 address for enp0s3:          192.168.0.13
  IPv6 address for enp0s3:          2405:6582:18e0:200:a00:27ff:fe4e:efa7


0 updates can be applied immediately.


Last login: Mon Jul 12 08:01:02 2021 from 192.168.11.52

mooseadmin@forestking:~$
This is all for this post about Ubuntu server. This is a good place to do backup in case if you want to do some different server setups, example with no dockers or Nginx.
And if something is seems wrong or missing please comment about it. I will gladly read and answer them.
Keep tune in here for the next post about “Docker” setup.
Until next time, stay safe and happy experimenting.
Blog Updates
- 2021-11-09
- Change screen shoot of Ubuntu Website
- Corrected some text in the guide.
- Made sure the content is [Up To Date].